Due to a series of unfortunate events, we took a road trip without our trailer. Our son was getting back from deployment, and we were determined to go to his homecoming. Since it’s the Marine Corps, we were given about 5 days notice of the actual return date. Of course, the actual date didn’t match up with the really great trailer trip we planned to take up to see him according to the preliminary window of return dates we were given. To make matters worse, the trailer was in the shop having some warranty work done, and wouldn’t be ready in time for the actual dates we needed it. We had no choice but to make the trip and stay in a hotel.
The trip was a 10-hour drive. This is much easier to do in one day when you drive a little Subaru and not a big truck and trailer. We decided to make a mad dash for it and try to make it a quick turnaround. And, that we did.
I could end this blog post right here and just say, we missed our creature comforts from our trailer. But, since you probably are looking for something to read while you eat your breakfast or something, I’ll expand. More specifically, here are the things we missed:
Our closets and drawers – We had to pack suitcases! The horror! We are not used to that! In our trailer, everything has its place. It’s the same with my suitcase, but it’s all squished into one suitcase sized spot. First world problem, I know, but I really love my trailer storage.
Our medicine cabinet – Our toothbrushes and toiletries live in there! Getting them out of toiletry bags and trying to share the tiny counter space in the hotel was a challenge. We’re just not used to that!
Our TV – We know how to work it and we know how to stream our favorite shows on it. The hotel TV was fine … if you like reruns of “Friends.”
Our food – When we are on an RV road trip, we don’t eat out much – except for lunches when we’re out exploring. This really helps keep us from getting “road trip gut” (that nasty, bloated feeling like the “Very Hungry Caterpillar” had when he needed to eat through a nice green leaf toward the end of the book). It also is much easier on the budget to cook some of your own meals.
Our bed and pillows – Again, we’re used to them! Hotel beds and pillows are just weird.
The air conditioner vent – This may seem like a strange one, but I find hotel air conditioners annoying. They’re loud, they come on whenever they feel like it, they blow the curtains around … they just bug me! In our trailer, we leave the air conditioner set at one temperature and have it run constantly while we sleep. We have the perfect temperature and some familiar white noise. And, the best part, there’s a vent that I can point straight to my head while I sleep!
Our dogs – We had to board them for this trip. We normally take them on our trailer trips. They love trailer trips, riding in the truck, and exploring new places. It was sad not to have them along.
Really, the hotel was fine aside from the dead bug collection in the elevator (they promptly vacuumed the bugs up when we told them about the collection). It was also during the awkward post-COVID time when the hotels were not sure how to handle things. There was no maid service happening. So, the fun parts about hotels – like leaving your towel on the floor and having a new one when you get back from exploring – were not happening. This made us miss our trailer even more – even though I’m pretty much the maid service for our trailer.
We love our trailer and love exploring the United States in it. We love America’s diversity in landscape – desert here – beach there – mountians there …. It’s awesome! RVing is a vacation lifestyle choice we’ve made 18 years ago and we’re glad we made it! Perhaps it’s the creature comforts that keep us going. When we do the math, owning, storing, and maintaining the trailer isn’t saving us a whole bunch of money on vacationing – maybe even none! We’ve even thought about maybe selling the trailer and traveling like “normal” people. Those thoughts never last more than a few minutes because we remind ourselves why we RV and what we’d miss if we didn’t have it. This year, with diesel prices going crazy, we’re taking shorter trips and are finding lots of new places to explore within three or four hours of home.
If you’re questioning your decision to start or to continue RVing, maybe it would be a good idea for you to think about all the little things you love about it and what you’d miss if you traveled like a “normal” person. I bet your creature comforts will come into play and you’ll love your RV just a little bit more. Happy Camping!
I love to travel in my trailer and I love to cook. RV kitchens can be a challenge with their small sinks, minimal cupboard space, and their weird ovens. We are now on our third trailer and with each one, I have gotten more kitchen space. I am currently spoiled with a pantry bigger than my home pantry, lots of drawers, and plenty of room for my dishes and pots and pans. This wasn’t always the case. My first trailer had very minimal kitchen space and I became a master of making everything I needed fit.
My first bit of advice for anyone setting up an RV kitchen is to figure out what kind of RV cook you’re going to be. Are you an everything-from-scratch-kind of person or a pop-it-in-the-microwave kind of person. If you’re the later, you are only going to be challenged by your freezer space and you won’t need much in the way of cookware or utensils. If you’re a little more like me, an almost-from-scratch sort of person, you’re going to need to figure out how to pack your kitchen just right. Here is how I have set up my RV kitchen and how it’s evolved over the past 16 years of RVing.
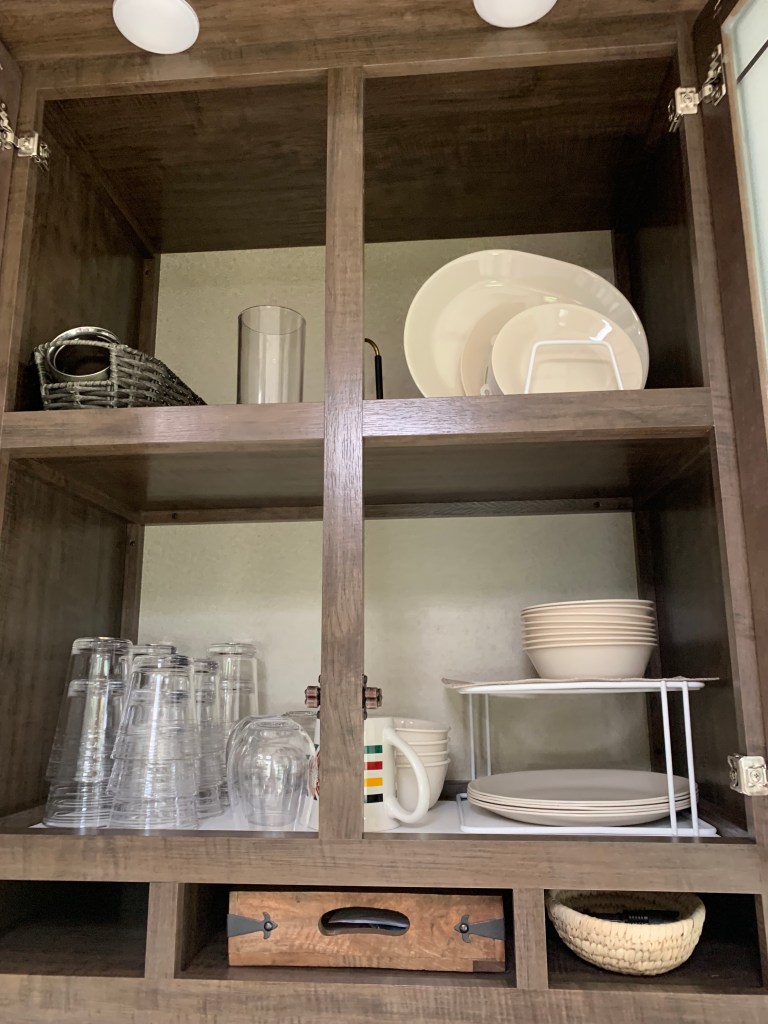
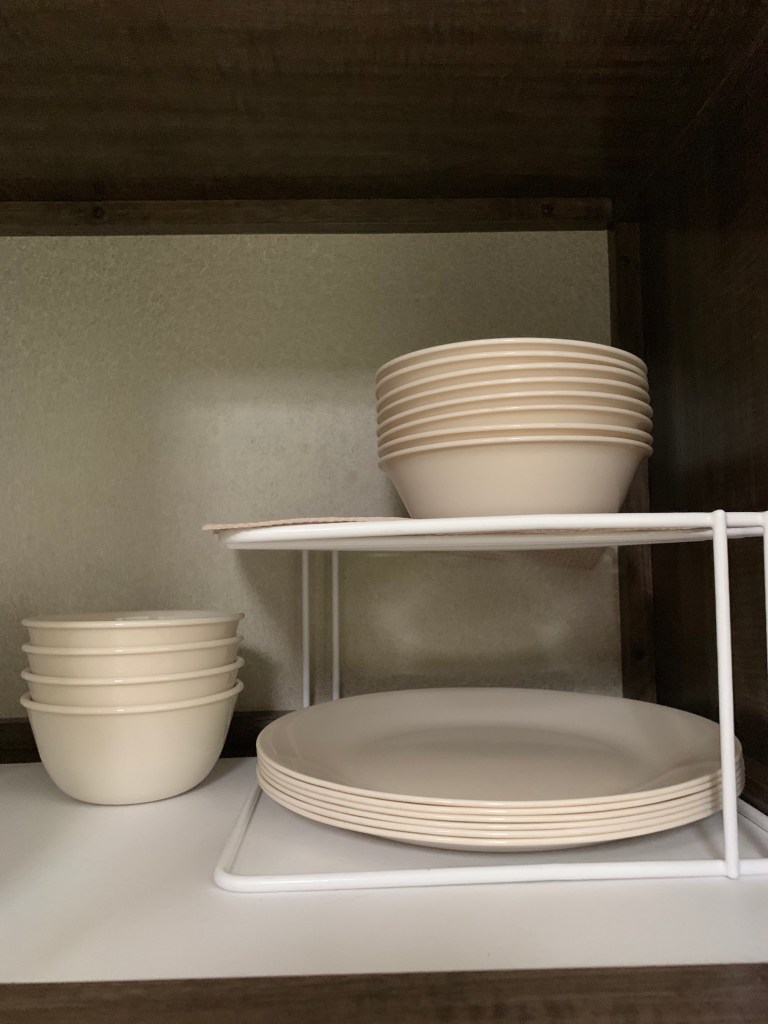
Dishes – I hate paper plates! I am also not a big fan of plastic-y dishes and cups. I want everything to feel as much like real dishes and cups as possible. 16 years ago, I bought a set of Corelle dishes that I am using to this day. They make great RV dishes because they don’t break or chip and they stack compactly.
My dishes cupboard in my trailer.
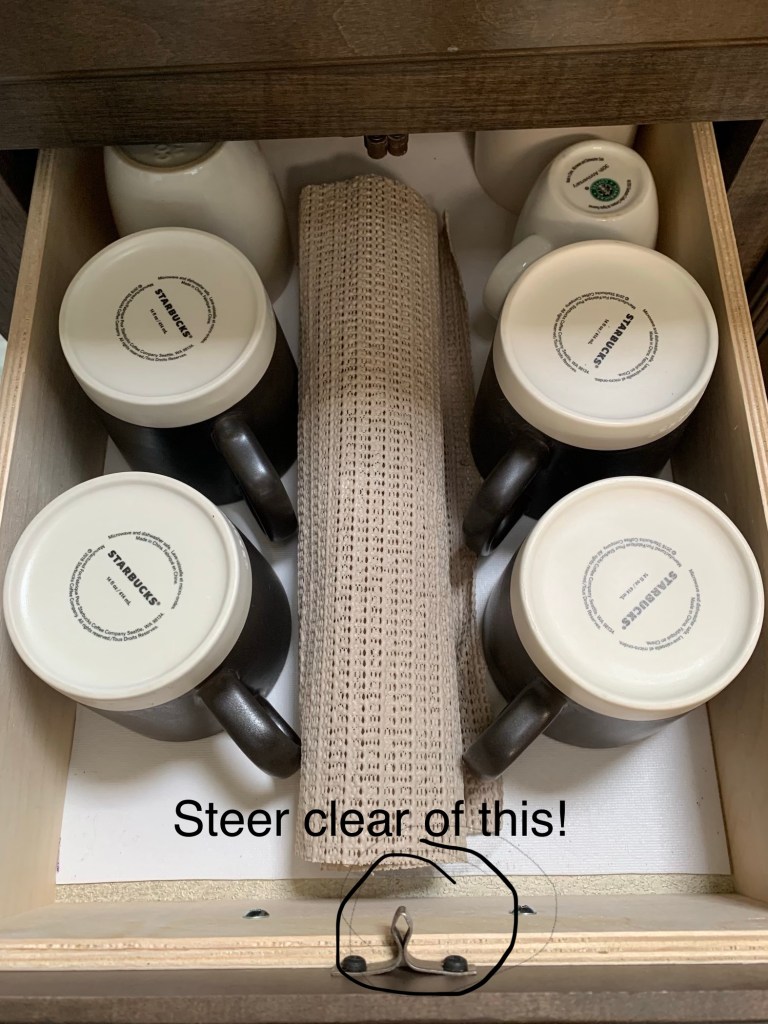
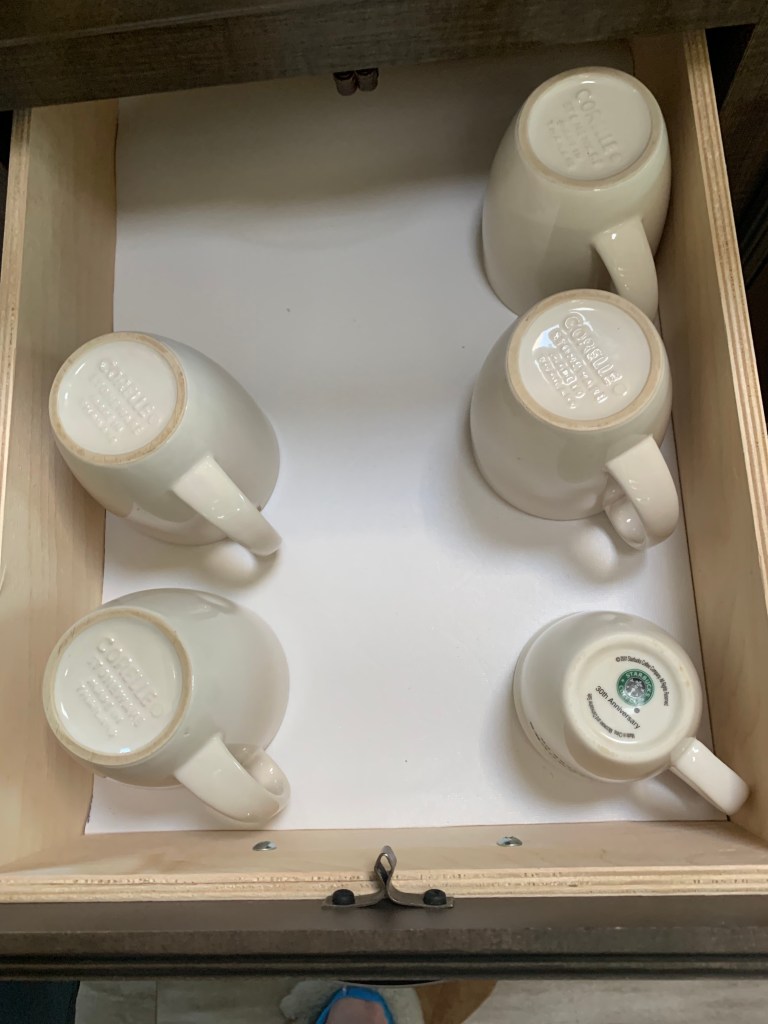
Mugs – Mugs are a very important piece of camping equipment! We have a couple of good travel mugs for when we need to have coffee in the car. Otherwise, we use regular mugs. After 15 years of use, the stoneware mugs from my Corelle set finally died. I have replaced them with some Starbucks mugs that look nice with my dishes. I keep them in a drawer. I find that mugs chip less in a drawer. If you store your mugs in a drawer, you need to measure your drawer before you buy your mugs. I looked a little weird when some kids I know caught me measuring the mugs at Starbucks. You need to make sure they’re not taller than the inside of your drawer and steer clear of the drawer catch thing (I’m sure there’s an official name for it). I lined the drawer with a non-slip liner and put a paper plate rolled up with some no-slip stuff around it in between the rows of mugs so they don’t bump into each other on the road. The paper plate set up was going to be a temporary measure until I thought of something classier, but it’s working! So, I think I’ll just leave it.
My mug drawer set up. The thing in the middle is a rolled up paper plate with some non-stick stuff wrapped around it. It keeps everything in place.
“Glassware”– I use acrylic “glassware.” I had some super cheap cups from Walmart for the first 10 years of RVing. They finally cracked and I sprung for some nicer ones from Crate and Barrel. They’re holding up really well. I also have stemless acrylic wine glasses (because trailers jiggle and you don’t want to spill your wine!). I found nice ones at Crate and Barrel.
Pots and Pans – My biggest piece of advice here is don’t cheap out! That’s right! Don’t go buying the cheapest stuff for your RV! Here’s why. You are on vacation! Your sink is smaller than your sink at home. You don’t have a garbage disposal. Your gray water tank is only so big. The last thing you need is your food sticking to some cheap pot or pan and to spend time and gray water tank space scrubbing! Get some good non-stick cookware for your rig. You can find decent T-Fal at places like Target and Walmart. Also, check places like Home Goods. Sometimes you can find higher end stuff like Calphalon at great prices. If your cookware has glass lids, store your lids on the pots or pans if possible. I have a rack for mine now and it’s working well. I’ve been traveling with glass pan lids for 16 years and haven’t broken one yet!
You need one “beater” pot – You should have one “beater” pot. Maybe one you’ve handed down from your home kitchen or bought used at someplace like Goodwill. I store my “beater” pot in the bench of my dinette. I use it when I need to cook outside or when I’m cooking something that might hurt my good pots, like clams.
Silverware– Get a good set you like and a silverware organizer for the drawer. No one likes a jumbled mess in the drawer when it’s time to set the table. You can find inexpensive sets of silverware at places like Target or Home Goods.
Utensils– I used to sell Pampered Chef. I am all kinds of picky about my utensils and it’s probably the one thing I have gone more overboard on. I haven’t really given into the “it has to have at least two purposes” mentality for this. For instance, I have an avocado cutting tool. It’s important! I also have a tomato corer and two different sizes of graters. Very important! The one thing I am persnickety about is that everything has to fit in its intended place. So, it took me forever to find the right cheese grater that would lay flat in the drawer and not be a cheap, flimsy one. After a couple months of searching, I found a great Microplane grater with a handle that doesn’t stick up. YAY!
Organizing your utensils – I have all of the utensils that I use near the stove (wooden spoons, rubber scrapers, tongs, etc) in a utensil holder on the counter near the stove. I stow it in the cupboard below when we are traveling. For all other utensils, I have them in drawers organized by size more than function. That’s to prevent the jumbled mess thing from happening in the drawer. I also have my knives in sheaths so that I don’t cut my fingers trying to find something else. I hate bleeding…
Roll-a-Roasters– Don’t go camping without them! They don’t take up much space! You’ll be the envy of everyone at the campground! Roll-a-Roasters are telescoping roasters for use with a campfire. They have a little turning screw that you can twist with your fingers while you roast. They make perfect marshmallows! You can find Roll-a-Roasters at Camping World or REI.
Roll-a-Roasters. Don’t go to a campfire without them!
Small appliances – Our first rig didn’t have much space in the kitchen for things like appliances. Our coffee pot was only a 4 cup coffee pot because we could fit it in the cupboard. We didn’t have enough counter space to actually leave it on the counter while we were camping. Because of that, I have learned to camp without any small appliances other than a coffee pot. When we got a bigger rig, we got a normal sized coffee pot (with a stainless-steel carafe. It’s not breakable and it keeps your coffee hot longer). The coffee pot upgrade was one of the most exciting things about getting a new trailer for us. We left our 4 cupper in the old trailer when we traded it in with a note about why whoever bought the trailer needed that tiny coffee pot. Many people like having a crock-pot or an insta-pot in their rigs. Now that I have space for one, I’m not sure I want one in the trailer. I don’t even have a toaster! If I want to toast something, I use a pan on the stove. I’ve gotten used to my “trailer” recipes that don’t require extra appliances. To be a good “trailer recipe,” the recipe must be fairly simple, not require more than two pots or pans, not be something that you have to spend too much time cleaning out of the bottom of a pan, and of course, be delicious!
A good grill is worth every penny! – We have had some grill failures. For instance, on our first trailer, we bought a gas grill that was basically a giant grill pan on wheels. While it worked OK, our steak had strange grill marks and it wasn’t as good as over an actual flame. Our second trailer had a cool grill that hooked up to a gas spigot thing on the trailer and had a little grill shelf on the back of the trailer. It was a great set-up … except for the part where the grill didn’t work for beans! We had to be super picky about what we cooked on it and the outside temperatures and wind had to be perfect or it would take forever! On our current rig, we sprung for a little Weber gas grill. We love it and it cooks great! My husband is the griller. It was hard to get him enthusiastic about grilling on the first two grills. Now, he’s much more willing and enthusiastic about going out, setting it all up, and grilling.
Grill pan – Funny story, since we had those first two grills that were sub-par and we do much of our camping in the rainy Pacific Northwest, we decided we should have a grill pan for the trailer in case our grilling plans were thwarted by weather or a lack of enthusiasm by the griller. We frequently camp in a town that has two kitchen stores, a big grocery store, and a hardware store that sells some kitchen things. Do you think we could find a grill pan there when we needed one? NO! It’s an artsy town. Our working theory is, there are just too many vegetarians and they don’t grill much (clearly, they haven’t tasted grilled vegetables!). I found a decent T-fal non-stick grill pan at our local Walmart after we got home from one of those trips. It’s come in handy!
Stones – I mentioned before that I sold Pampered Chef. I have several baking stones in my trailer that I think are a big help to RV baking. RV ovens are weird. The stones (along with tiles on the bottom of your oven) help distribute the heat more evenly and prevent burning on the bottom. I have a pizza stone, a round stone (like a cake pan), and a 9 x 9 square baker.
Baking sheets – Before you buy a baking sheet, measure your oven! I have messed this up more than once! My husband has bent baking sheets so they fit. Another time I bought one that almost fit and we just left the oven door open a little. Lame! I should have measured first! After you measure, go someplace like Home Goods or a kitchen store. They’ll have a better size selection. Buy heavier metal baking sheets to prevent burning on the bottom. If you’re lucky, you might find a silpat mat to put on it that will help with clean up. I haven’t been quite that lucky…. Yet….. I love kitchen stores! It’s fun to always have something to look for.
Cute dishtowels and pot-holders you like – Don’t go taking your old, stained dishtowels from your house and put them in your trailer! Go pick out some that make you happy! You’ll be seeing them a LOT while you’re camping! Also, you’ll be using a lot of them if you cook! Most likely, you’ll need to hang them to dry somewhere like your oven handle and it’ll be out where you can see it. You want something you like there, not something stained and ugly! Lately, have been collecting cute dishtowels from places I visit. It’s fun to have reminders of past trips.
I am the “scullery maid” on our trips. That’s what my husband jokingly calls me. I don’t mind because he’s the “hose master” and the driver. This little division of labor gives us each some say in our areas. He has veto power over what we listen to while on the road, for instance. Saddly, there’s not much upgrading you can do with hoses, but he has the best he can find! He likes eating well on the road and doesn’t question my choices in cookware. It works! Although, truth be told, he did look at me a little like I was crazy when I put bread in a basket with a cloth napkin liner on the table! I finally had enough room for the basket and room in the drawer for a couple of cloth napkins. Time to get a bread basket!
Here’s my shopping list for setting up an RV Kitchen:
Serving:
Set of Corelle Dishes
Mugs that fit where you’ll store them
Acrylic “Glassware”
Set of silverware and silverware organizer
Cooking:
Set of non-stick pots and pans including; stock-pot, sauce pan, small sauté pan, larger sauté pan, and a skillet with higher sides than a sauté pan.
Non-stick grill pan
Beater pot
Set of nesting mixing bowls with lids (mine are stainless steel and I’ve had them 16 years!)
Pampered Chef Micro-cooker (great for cooking things like Costco chicken tenders that you’ll be putting in another recipe or for thawing the meat you forgot to take out of the freezer)
Pyrex type measuring cup
Nesting dry measuring cups
Measuring spoons
Favorite Utensils:
Chef’s Knife, smaller knife, paring knife, and serrated knife (I love my bread knife – works on watermelons too!)
Pizza Cutter
Rubber scrapers
Wooden Spoons
Rubber tipped tongs
Flat silicone covered whisk (for stirring in non-stick pots)
Regular whisk (for things like scrambling eggs)
Cheese grater (or 2!) – my favorite are Microplane with handles that help them lay flat in the drawers
Roll-a-Roasters
Baking:
Baking stones
Heavy baking sheets that fit in your oven
Other things:
Good Grill
Cute Dishtowels
Coffee pot with stainless steel carafe
Tea Kettle
Cutting Boards you like and that don’t slip while you’re cutting
A word about shopping. I am a big fan of brick and mortar stores. I like to touch things like mugs and glasses and see how they’ll feel in my hands. I like to feel the weight of a pot, pan, or a baking sheet. You can’t do that by shopping online! I also like to support small businesses as much as possible and will buy something at a small kitchen shop before going to a someplace like Target. I’ll even pay a few bucks more to buy something from small mom and pop shop than say, Amazon, to help support their business. I encourage you to get off your computer (when you’re done reading this blog post, of course!) and go to actual stores! It’s fun and you’ll be doing the brick and mortar stores a big favor! Additionally, you’ll be doing yourself a big favor by buying things that are more to your liking and that fit in your rig! Win-Win!
Next Trailer Girl Blog – Those Amazing Gadgets, Why I Won’t Pay for Most of Them, And a Few That Have Won Me Over
This recipe is one we made on our first ever trailer trip and completely burned the bottom of it in the trailer oven. We had to scrape off all the toppings and eat them for dinner! (See my blog post called “Don’t Burn Your Biscuits” for tips on how to deal with RV ovens). It became a trailer trip staple because I can get it going while my husband was outside getting the trailer set up. I can have it in the oven and side salads ready to eat by the time he gets done outside. It works great! We now officially refer to it as “Trailer Pizza” even when we eat it at home. Hope you enjoy it!
Ingredients
1 Pilsbury canned pizza crust
About 8 oz Chicken cooked (I use frozen chicken tenders and cook them in a Pampered Chef micro cooker with water in my microwave)
1 Sprig of Rosemary – chopped
2 Cups Shredded Mozzarella Cheese
2 – 3 Cloves Garlic
1/2 Medium Red Onion – thinly sliced
3 TBSP Olive Oil
1/2 Tsp Salt
Directions
Heat oven to 425 degrees
Pop open your pizza crust onto a cookie sheet and spread evenly over the cookie sheet (I use a rectangle pizza stone)
Mix together: Chicken, 2/3 of the cheese, Rosemary, Garlic, and Onions
Add Olive Oil and Salt and Mix together
Spread over pizza crust
Top with remaining cheese
Turn oven DOWN to 400 degrees and bake for 10 minutes. After 10 minutes check it and turn it (unless your RV oven cooks perfectly!), and bake about 10 minutes more until crust is golden on the bottom and cheese is melted. Depending on your oven issues, your cheese may not brown without burning your crust. If that’s the case, turn the oven down again and try getting the cheese to brown a little more.
Next Trailer Girl Blog – Winter Blues – How Not to Get Sad When your Rig is Winterized
Setting up your RV Kitchen – Maximizing Space and Efficiency
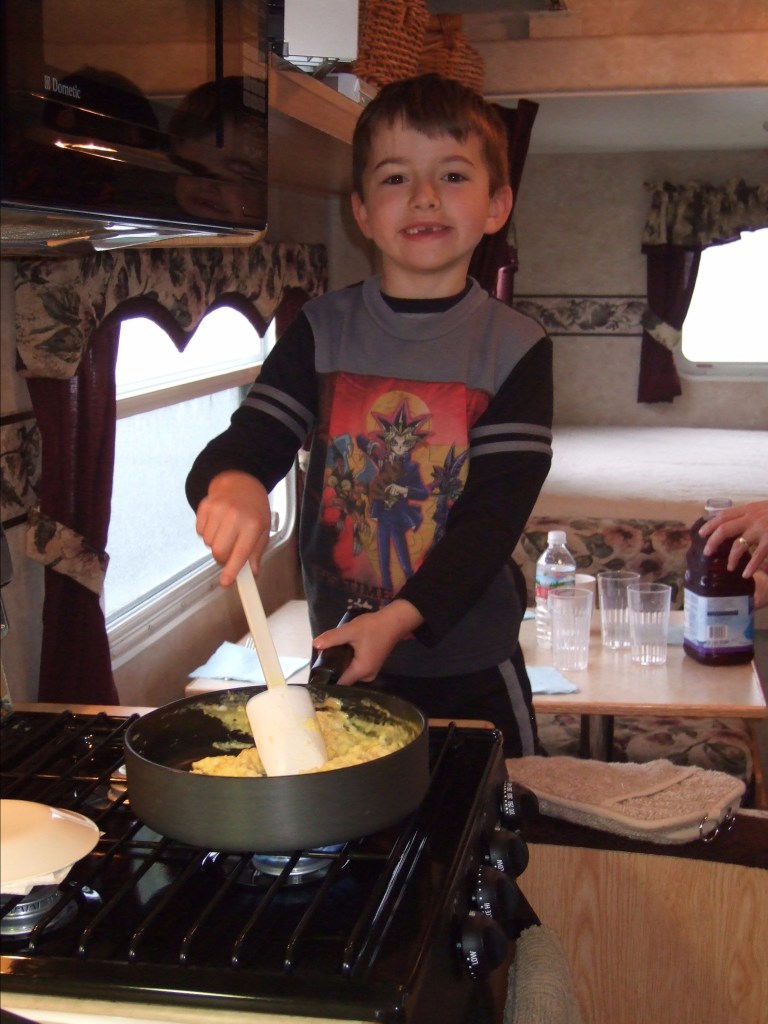
Eating together on vacation is fun! Sitting around the dinner table talking about the day’s adventures is a great way to connect as a family. In the feature picture for this blog post, are my parents who got us into RVing, my kids, and my husband getting ready to have a little brownie party in our first trailer (notice the awful upholstery that I wrote about in my last blog about decor.) Our first trailer had a galley type kitchen with very limited space, but we made it work. Our second trailer had quite a bit more space for the kitchen, an island, a real pantry, etc. Our new 5thwheel has a kitchen that has more space than my first apartment! I’ve learned some things along the way that have helped us have an efficient kitchen and more fun cooking. I’ve also learned, I can probably never go back after having actual counter space!
Two key things to keep in mind when you’re setting up your kitchen:
You are on vacation! This is your vacation home! Don’t take all of your beat-up hand me downs out of your home kitchen and put them in your trailer. Fill it with dishes you like (that won’t chip or break), quality cookware, and utensils that work for you.
Keeping other people out of your way will make cooking in an RV kitchen lots more fun. In our first trailer, the kitchen was a pass-through area between the door and the living/dining area. We called that kitchen a one-butt kitchen in that only one butt could be in the kitchen at a time (unless, of course, the other butt was drying the dishes!). So, we put the silverware drawer under the coat closet and the dishes in the drawer under the dinette. That way, when it was time for anyone to help, they were out of my way while I was cooking. Now, we have an island. The silverware drawer is at the end of the island that’s furthest from the stove. The dishes are in the cupboard at the end of the island. This works for getting help setting the table and it also works beautifully for washing dishes and putting them away. They go from one side of the sink dirty, to the other side dried and put away. Think through your kitchen and how you’ll use it. Then, put things away in a way that works for you and your family. If you’re already in your RV and are bumping into each other, fix it!
My son, Ben at the age of 5, in our first trailer standing on the dinette, helping cook. Notice my husband in the background working on setting the table – totally out of the way. (Ben is now 19 and serving in the US Marine Corps. He helps cook when he comes home!)
Corelle dishes – These are almost unbreakable. When they do break, they explode! We’ve had the same set for 15 years of RVing and have only lost two plates when we set up a cupboard poorly and the cupboard door popped open while we were on the road. Luckily, it was a set of 8 place-settings, and we could never fit that many people in our rig anyway! These dishes also stack very compactly. They’re a great choice for RVing. I like to add little free-standng shelves in my cupboards. When I set the dishes up poorly that one time, I set the plates on the top shelf. They’re too slippery for that! Bowls that next are a better idea. They don’t slide around.
My Corelle dishes minus two plates. Don’t put the plates on the top shelf! They turn into projectiles! Notice the no-slip liner under everything.
When it comes to the kitchen, think space-saving – Think things like nesting mixing bowls and measuring cups. You can also find things like a collapsible colander to save space. Try not to buy things that only serve one purpose unless you really can’t live without it. For instance, I can’t live without my Pampered Chef avocado tool. So, I have one in my utensil drawer. Very important!
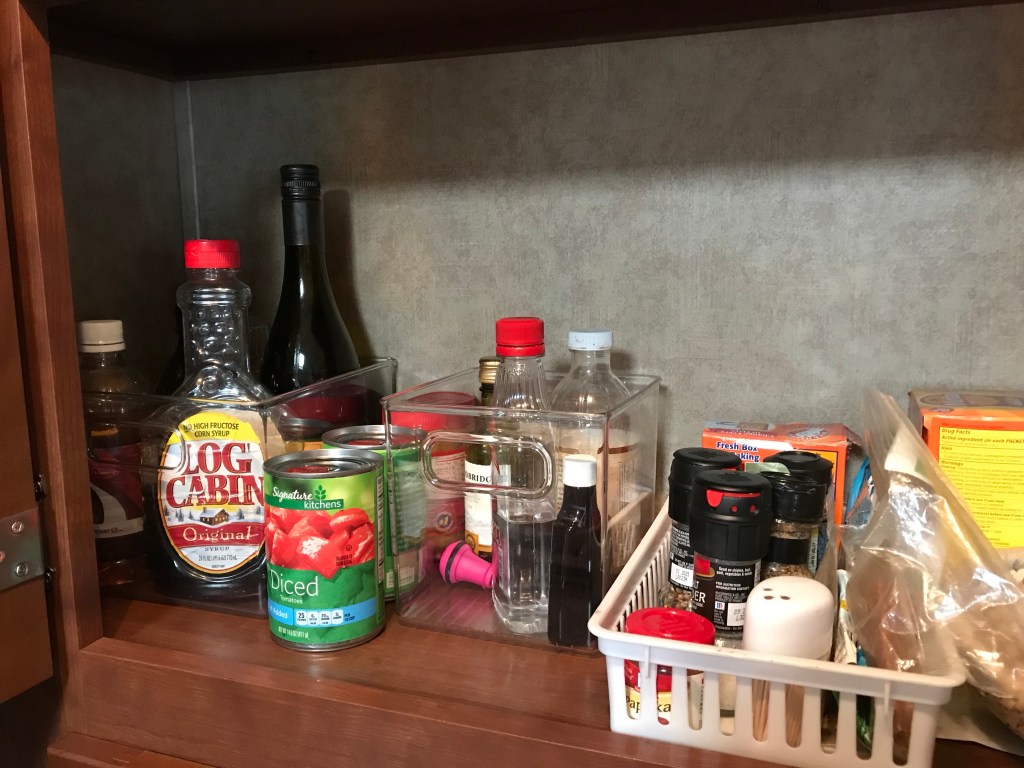
Find ways to avoid jumbled messes – I am in love with these clear plastic bins that you can put in drawers and in cupboards, refrigerators, and pantries. They not only keep things organized, but they keep taller things like bottles of olive oil or wine from toppling over. They also keep little leaks out of your cupboards. I have them all over my rig! They are in the kitchen drawers, in the bedroom drawers, etc. I love shopping for these at the Container Store because they have every size imaginable. Amazon also has a bunch. I have also seen them at Home Goods, Bed Bath and Beyond, and a few other places. Here’s an Amazon link some for the pantry https://www.amazon.com/interDesign-Kitchen-Organizer-Refrigerator-Freezer/dp/B00CS8DT00/ref=sr_1_5?keywords=pantry+binz&qid=1561341129&s=gateway&sr=8-5
I love pantry bins! The clear ones are my favorites!
Sort your kitchen utensils by size and then, category – If your kitchen utensils are in a drawer, sort them by size. They stay less jumbled that way. I sort by size first and then, by category. Use the little sorting bins mentioned above. For instance, I have my knives on the long side of the drawer where aren’t any little bins. Little utensils for working on vegetables like my avocado tool and tomato corer are in the same bin. If You’ll have a much easier time finding things and spend less time digging through your drawer. You’re on vacation! Looking for things isn’t fun!
Utensil holders – If you have room on your counter, a utensil holder is great. I have one and put it in the cupboard when we travel so it doesn’t slide. In our last trailer, I was able to wedge it between the coffee maker and the wood valance thing and it didn’t move. I love to cook. Having my most used utensils handy is important to me!
I love a mug drawer! – We had our first trailer for 10 years and kept our mugs in a drawer lined with no-slip liner. We never had a single chip. We got a new rig and put them in the cupboard and got all kinds of chips! I have designated a mug drawer in our new 5thwheel. I’m pretty excited about it!
I love my mug drawer!
Get good non-stick cookware– You can buy decent non-stick cookware and the prices are all over the map! Check out places like Home Goods, TJ Max, and even Target for nicer pots and pans. Remember, you won’t have a garbage disposal and probably won’t have a dishwasher. The last thing you want to do on a vacation is to work hard at scraping things out of your pots and pans into the trash and then, scrubbing them. No fun!
Measure your oven! – RV ovens are weird and aren’t universal in size. Each of our trailers have had a different sized oven. I once bought a cookie sheet for the trailer without measuring. It would have fit had it not had little handles. My husband bent it up to make it fit. This time, I measured! I have a really nice, new cookie sheet that’s going to actually fit! If you’re using something like a Dutch Oven, you’ll want to measure the height to make sure it’s going to fit. (See my blog entitled, “Don’t burn your biscuits – Dealing With Weird RV Ovens” for tips on getting your oven set up to cook better).
Under the dinette storage – If you have a booth dinette, you most likely have extra storage. That’s where I put things that I don’t use as often – like my beat-up pot that I cook clams in. If you have a drawer in your dinette bench – lucky you! That’s where we put our dishes in our first trailer. In all of our trailers, we have also store beach towels in the dinette. Funny thing, we live in the Pacific Northwest and do most of our trailer trips to places without warm beaches. When I moved the beach towels into our new rig, we still had Little Mermaid and Power Rangers towels. My kids are now 23 and 19. It’s been a while since they were used!
If you have a shallow, wide drawer – this is a great place to put things like cookie sheets, cutting boards, a flat cheese grater, etc.
Counter space maximization – Many RVs are short on counter space. If yours didn’t come with the extra pieces of counter that you put over the sink, I recommend having some cut. Have two cut – each ½ of your sink’s size. This way you can have half or all of your sink covered. This will add some space onto your counter. Your stove probably has a cover. We use the cover on the stove for extra counter space when needed for things like pizza boxes (because sometimes, ordering pizza is a life-saver!)
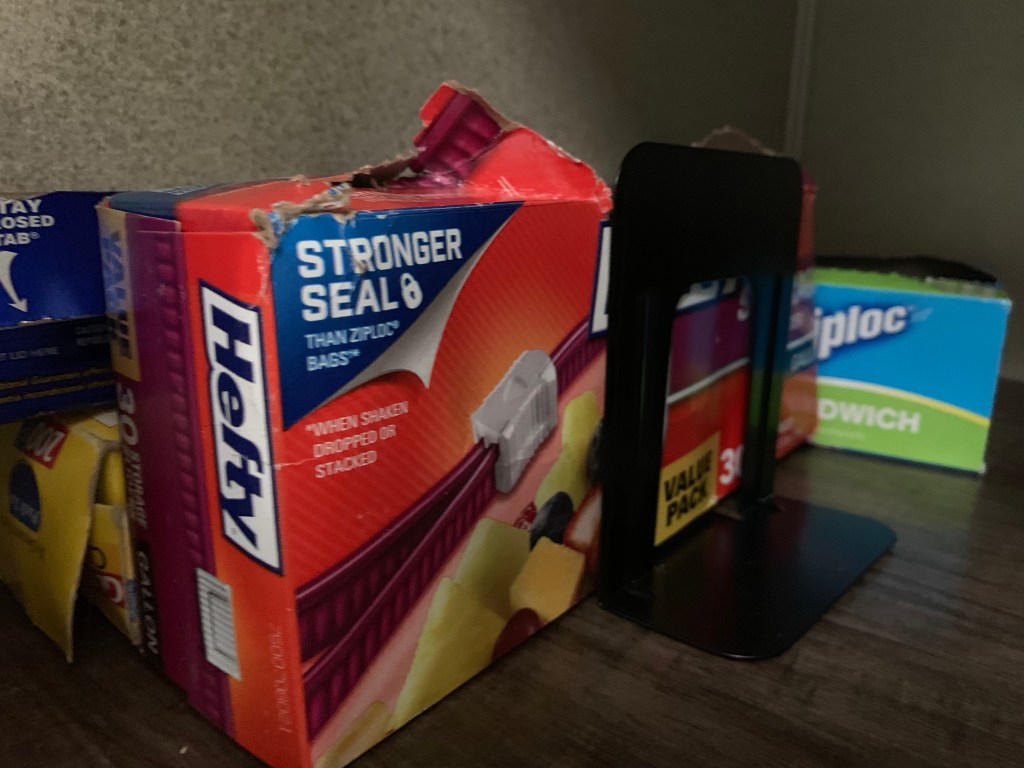
Non-slip bookends– I have recently discovered a new use for non-slip bookends. These are very inexpensive and a great way to keep things like boxes of foil and Ziploc bags from sliding around in the cupboard. I’m also planning to use them to hold up boxed food like cereal. They come in a package of two for about $4.
Bookends keep things like ziplock bags, foil and saran wrap from flopping over while you travel.
If you’re still shopping for your RV, make sure you don’t get wooed by the rest of it and settle for a kitchen that you have to make work for you. When we were shopping, I’d check out the kitchen first. If I didn’t like the kitchen, I didn’t bother to look at the rest of the rig. The kitchen is that important to me. My husband went along with this crazy method because he likes it when I like to cook while we’re camping (fake camping).
I hope you’ve found at least a little take-away that you can use in your trailer or maybe your kitchen at home. Happy kitchen set up!
Next Trailer Girl Blog Post – Setting up your Bedroom and Bathroom